サポート
LNX SETTING TOOL
LNX SETTING TOOL
Overview
LNXシリーズ設定ツールにより設定データをmicroSDカードに保存/読込することができます。このツールは製品付属のCDに収録されておりインストールは不要です。
Setting tool supports data saving and reading using microSD card. This tool does not require installation.
 LNX_SETTING_TOOL download
(Support OS: Windows 10 / 8.1 / 8 / 7 / Vista / XP)
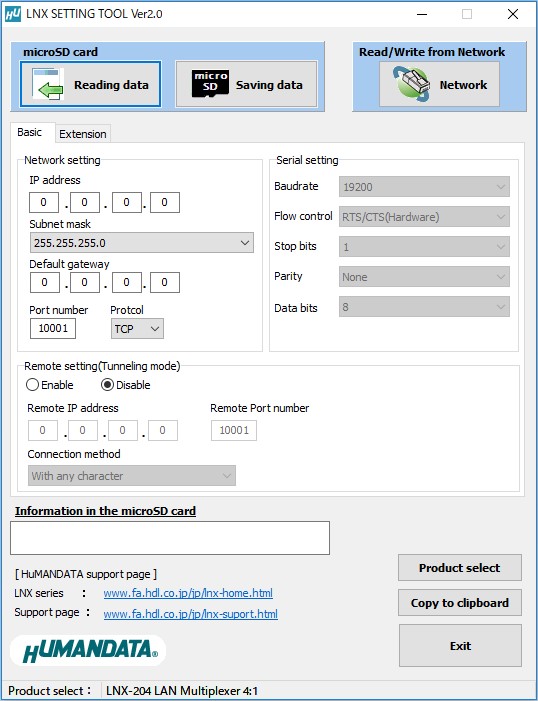
画面はVer2.0、LNX-204の設定例です
作成した設定データを設定用メモリカード(microSD)に挿入し、電源を入れることで自動的に設定されます。この時、設定データのバックアップファイルが設定用メモリカード(microSD)に作られます。設定データは電源を切っても保存されていますので、次回からはmicroSDカードを挿入する必要はありません。LNXシリーズの本体を交換したとき、設定用メモリカード(microSD)を使うことで、簡単に同じ設定にすることができます。
詳細につきましては各製品のマニュアルを参照してください。
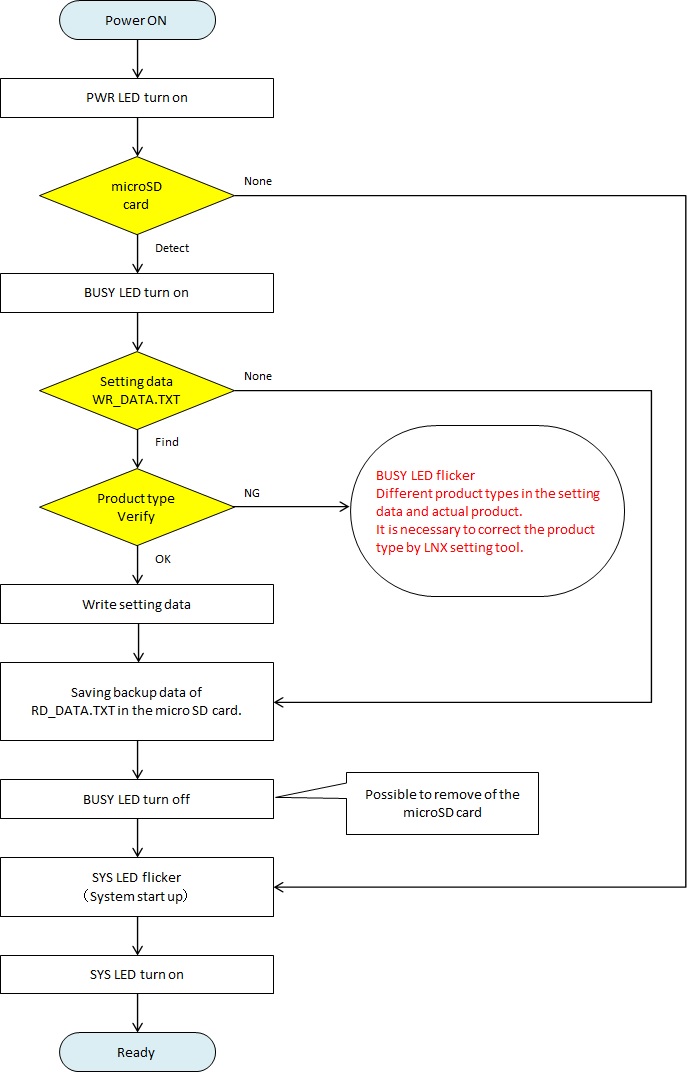
After saving the configuration data to the microSD card, please insert it to the product. Then the setting data, WR_DATA.TXT, will be read automatically when the product is powered on. At that time, the read data is backup in the microSD card as RD_DATA.TXT.
The setting data is stored in the product. No need to indsert the microSD card next time.
When replacing LNX series, just insert the same microSD card then you could restore the same setting.
When your PC is in the same segment as LNX series, you can also control the setting via ethernet.
Access Flow of microSD card
Release notes
-
2020/**/**: Version 2.4
Added new product.

[]
RoHS (Restriction of Hazardous Substances) Compliant Definition
Management of RoHS Directive-Controlled Substances in HuMANDATA’s Products
Management of RoHS Directive-controlled substances in HuMANDATA’s products is implemented through the following measures. We intend to learn day by day and take actions accordingly. We will promote management taking into account guidance from our customers.
| Number | Item | Description | Remarks |
|---|---|---|---|
| 1 | Parts used | RoHS Directive-compliant parts shall be selected/adopted. | If other alternatives must be used, their manufacturing records shall be managed by serial number. |
| 2 | Solder used | The solder used for mounting and/or reworking shall be lead-free. | |
| 3 | PCB | To reduce the risks of problems caused by lead-free solders, all the PCBs shall be gold-flashed. | |
| 4 | Screws/accessories | Screws and nuts used shall be free of chrome or other such materials. Accessories and packaging materials used shall be as environmentally friendly as possible. |
By implementing the measures described above, HuMANDATA will promote environmental efforts. Our management does not guarantee compliance with the laws and regulations enacted or enforced by each EU member country, or foreign and domestic laws to be enacted in the future. All information is based on documents/e-mails provided by, or interview surveys with, our suppliers. Some information may be substituted by information provided on the manufacturers’ websites. The components were not analyzed by our company. The information is based on the relationship of trust between our company and our suppliers. Our understanding is that the reliability of our products is also based on a relationship of trust between our customers and our company. Management is conducted with the utmost care; if any directive-controlled substances are identified in our current products, we shall not provide any compensation or take any responsibility.
Please note that we will not provide tables of components or other similar materials on our products. All the materials available at the time of purchase of products are released in advance. Please refrain from asking for additional materials after the product has been shipped.
Icons Used on the Website
-
The RoHS6 icons
 are used for products for which management of the 6 substances controlled by the original RoHS Directive (lead, mercury, cadmium, hexavalent chromium, PBB, PBDE) has been confirmed.
-
The RoHS10 icons
 are used for products for which management of the 4 additional substances controlled by the amended RoHS Directive (DEHP, BBP, DBP, DIBP), along with the 6 substances controlled by the original RoHS Directive, has been confirmed.
-
The
 icons are used for products which may contain RoHS Directive-controlled substances.
* The ![]() and
and ![]() icons show that contents of the RoHS Directive-controlled substances have been confirmed to be “equal to or less than the threshold values”. The threshold values correspond to the values controlled by the EU RoHS Directive. The CE icons
icons show that contents of the RoHS Directive-controlled substances have been confirmed to be “equal to or less than the threshold values”. The threshold values correspond to the values controlled by the EU RoHS Directive. The CE icons ![]() are used for RoHS Directive-compliant or CE-compliant products.
are used for RoHS Directive-compliant or CE-compliant products.
*The RoHS markings ![]() on the product main units have been used to indicate compliance with the original RoHS Directive (that covers 6 substances); they do not indicate that the products are compliant with the amended RoHS Directive (that covers 10 substances).
on the product main units have been used to indicate compliance with the original RoHS Directive (that covers 6 substances); they do not indicate that the products are compliant with the amended RoHS Directive (that covers 10 substances).
![]() is a trademark and registered trademark of HuMANDATA.
is a trademark and registered trademark of HuMANDATA.
We are investigating the management status of the 10 substances controlled by the amended RoHS Directive (RoHS2) one by one. The products for which management has been confirmed are listed in the table below.
| Number | MODEL | Description |
|
|
|
|
|---|---|---|---|---|---|---|
| Status | Status | Confirmed date | Status | |||
| USB-003 | USB RS485/RS422 Converter |
|
|
Jul. 16th, 2019 |
|
|
| USB-010 | USB RS485/RS422 Converter |
|
|
Jul. 16th, 2019 | ||
| USB-013 | USB RS232C Converter |
|
|
Aug. 2th, 2019 |
|
|
| USB-029 | USB Isolator |
|
|
Jul. 17th, 2019 | ||
| USB-029H | USB Isolator Industrial-Grade |
|
|
Jul. 17th, 2019 | ||
| USB-029H2 | USB2.0 Isolator Industrial-Grade |
|
|
Jul. 17th, 2019 | ||
| USB-029H2-RP | USB2.0 Isolator with Repeater IC |
|
|
Jul. 17th, 2019 | ||
| USB-029L | USB Isolator Compact |
|
|
Jul. 17th, 2019 | ||
| USB-029L2 | USB2.0 Isolator Compact |
|
|
Jul. 17th, 2019 | ||
| USB-033 | 4 Channel RS232C/USB Converter (Independent Isolation Type) |
|
|
Aug. 15th, 2019 | ||
| USB-033SI | 4 Channel RS232C/USB Converter (Common Isolation Type) |
|
|
Aug. 15th, 2019 | ||
| USB-03G1 | USB3.0/3.1 Gen1 Isolator |
|
|
Aug. 2nd, 2019 | ||
| USB-043 | USB Isolator Board |
|
|
Jul. 22th, 2019 | ||
| USB-201 | USB Multiplexer 8:1 |
|
|
Oug. 25th, 2019 | ||
| USB-202 | 4 Port USB Isolator (Independent Type) |
|
|
Mar. 31th, 2020 | ||
| USB-203 | 4 Port USB Isolator (Common Type) |
|
Confirming | |||
| USB-205 | USB 3.0 Multiplexer 4:1 |
|
|
Oct. 3rd, 2019 | ||
| USB-206 | USB 3.0 Host Multiplexer |
|
|
Oct. 3rd, 2019 | ||
| USB-301 | LPT-CAPTURE-USB Parallel/USB Converter |
|
|
Oct. 3rd, 2019 | ||
| USB-302 | 2 Channel USB to RS232 Converter |
|
|
Jul. 22th, 2019 | ||
| USB-303 | 2 port USB Isolator |
|
Confirming | |||
| USB-304 | 2 channel USB RS485/422 Converter |
|
|
Aug. 15th, 2019 | ||
| USB-401 | 8 channel USB RS232 Converter (Common Isolation Type) |
|
|
Mar. 31th, 2020 | ||
| USB-402 | 8 channel USB RS485/422 Converter |
|
|
Mar. 31th, 2020 | ||
| USB-501 | USB to RS-232C Converter Compact |
|
|
Aug. 15th, 2019 | ||
| USB-503 | USB to RS485 Converter Compact |
|
|
Jul. 22nd, 2019 | ||
| USB-503-RJ45 | USB to RS485 Converter (RJ45 type) |
|
|
at the first release | ||
| LNX-002 | RS232C LAN Converter |
|
|
Aug. 2nd, 2019 | ||
| LNX-002e | RS232C LAN Converter economy type |
|
|
Aug. 2nd, 2019 |
|
|
| LNX-003 | RS-485/422 LAN Converter |
|
|
Aug. 2nd, 2019 |
|
|
| LNX-003e | S-485/422 LAN Converter economy type |
|
|
Aug. 2nd, 2019 |
|
|
| LNX-007L | LAN Isolator (Compact) |
|
|
Aug. 2nd, 2019 | ||
| LNX-201 | LPT-CAPTURE-LAN |
|
|
Sep. 11th, 2019 | ||
| LNX-203 | 2 channel RS232C LAN Converter |
|
|
Sep. 11th, 2019 | ||
* HuMANDATA may change the content declared here at any time. The contents of this page make no guarantee, neither in the past nor in the future; rather, this page is simply a declaration of our stance at the present moment. When domestic Japanese law applies, we will conform to the laws thereof.
[]
USB Driver Installation Guide(FTDI)
USB Driver Installation Guide(FTDI)
If you want to update the driver, please update after uninstall the existing driver.USB Driver Uninstallation Guide(FTDI)
- Insert the driver CD into the CD drive and open the folder CD_Drive:\Driver\USBDRV-CDM***.
Latest USB driver is available for download from the link following.
https://www.hdl.co.jp/en/faspc/Drivers/index.html - Click on the setup.exe file icon.
- In Windows 11/10/8.1/8/7/Vista, a User Account Control dialog box opens.
Click on the "Yes" button. - Window appears on the screen for decompressing the compressed driver file.
Click on the "Next" button. - USB Driver Installer Ver.* window appears.
Do not connect the product to your PC when you are installing the driver.
After checking the "Confirm disconnection", and click on the "OK" button.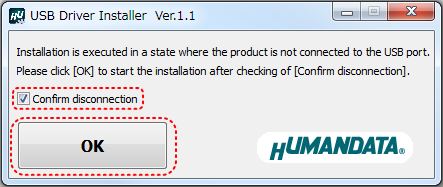
- The installation wizard starts. Click on the "Next" button.
- In Windows 11/10/8.1/8/7/Vista, Windows Security dialog box appears twice during the installation.
Click on the "Yes" button. - When the installation is complete, the installation completed dialog box appears.
Click on the "Finish" button. - -1) Windows 11/10/8.1/8/7/Vista
Connect the product to your PC, an icon appears in the notification area, and the driver is installed automatically.
When the driver has been successfully installed and the USB-003 is connected to your PC, “USB-003 HuMANDATA LTD.” appears in Device Manager.
-2) Windows XP
Connect the product to your PC, the Found New Hardware Wizard starts.
Select No, not this time, and click on the "Next" button.
Select Install the software automatically, and click on the "Next" button.
When the installation is complete, the message “Completing the Found New Hardware Wizard” appears. Click on the "Finish" button.
In Windows XP, you need to run several times the above steps. Number of times may vary depending on each product.
When the driver has been successfully installed and the USB-003 is connected to your PC, “USB-003 HuMANDATA LTD.” appears in Device Manager.
[ ]
CDC Class Driver Installation Guide
CDC Class Driver Installation Guide
If you want to update the driver, please update after uninstall the existing driver.CDC Class Driver Uninstallation Guide
- Insert the driver CD into the CD drive and open the folder CD_Drive:\Driver\CDCDRV-***.
Latest USB driver is available for download from the link following.
http://www.hdl.co.jp/en/faspc/Drivers/index.html - Click on the setup.exe file icon.
- In Windows 10/8.1/8/7/Vista, a User Account Control dialog box opens.
Click on the "Yes" button. - Window appears on the screen for decompressing the compressed driver file.
Click on the "Next" button. - USB Driver Installer Ver.* window appears.
Do not connect the product to your PC when you are installing the driver.
After checking the "Confirm disconnection", and click on the "OK" button. - The installation wizard starts. Click on the "Next" button.
- In Windows 10/8.1/8/7/Vista, Windows Security dialog box appears twice during the installation.
Click on the "Yes" button. - When the installation is complete, the installation completed dialog box appears.
Click on the "Finish" button. - -1) Windows 10/8.1/8/7/Vista
Connect the product to your PC, an icon appears in the notification area, and the driver is installed automatically.
When the driver has been successfully installed and the USB-201 is connected to your PC, “USB-201 HuMANDATA LTD.” appears in Device Manager.
-2) Windows XP
Connect the product to your PC, the Found New Hardware Wizard starts.
Select No, not this time, and click on the "Next" button.
Select Install the software automatically, and click on the "Next" button.
When the installation is complete, the message “Completing the Found New Hardware Wizard” appears. Click on the "Finish" button.
In Windows XP, you need to run several times the above steps. Number of times may vary depending on each product.
When the driver has been successfully installed and the USB-201 is connected to your PC, “USB-201 HuMANDATA LTD.” appears in Device Manager.
[ ]
USB Driver Uninstallation Guide(FTDI)
USB Driver Uninstallation Guide (FTDI)
HFTClean.exe
HuMANDATA USB Driver Uninstall Tool Ver.4
Overview
HFTClean.exe is a tool to uninstall the USB driver. It is possible to easily uninstall the USB driver of the product built-in the FTDI chip with the HuMANDATA Vender ID.
This program will be operated with the following OS.
- Windows11
- Windows10 (32/64bit)
- Windows8/8.1 (32/64bit)
- Windows7 (32/64bit)
- WindowsVista (32/64bit)
- WindowsXP (32/64bit)
This uninstaller uninstall the driver as an argument of the vendor ID of HuMANDATA product by using the CDM Uninstaller 1.4 provided by the FTDI.
Appropriate models
| FT232/245 | FT2232H | FT4232H |
|---|---|---|
| USB-003 | USB-010 | USB-033 |
| USB-013 | USB-302 | USB-033SI |
| USB-301 | USB-304 | USB-039 |
| USB-503 | USB-401 | |
| USB-503-RJ45 | USB-402 |
*USB-201, USB-205, USB-206, USB-501 are not able to use HFTClean.EXE, because they are not equipped with FTDI chip.
*Products common PID is being used may be also uninstalled at the same time other products.
Uninstall Procedure
-
Insert the driver CD into the CD drive and open the folder CD_Drive:\ Application\ HFTClean.
You can also be downloaded from here.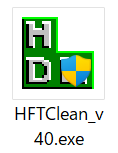
- Click on the HFTClean_v**.exe file icon.
- In Windows 11/10/8.1/8/7/Vista, a User Account Control dialog box opens. Click on the "Yes" button.
- Window appears on the screen for decompressing the compressed driver file.
Click on the "Next" button. - Exe file are extracted to a temporary folder. Application will be automatically run.
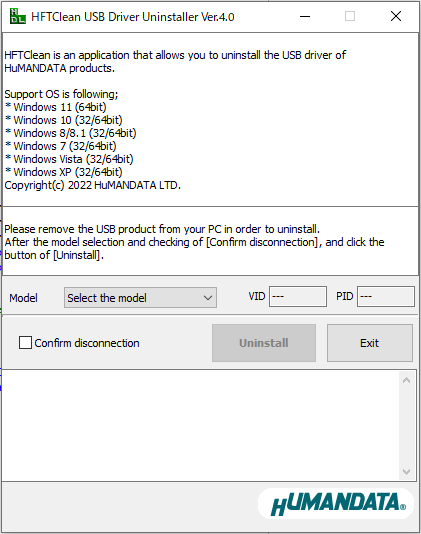
- Select the model that you want to uninstall. It is also possible to specify all of the model.
- Do not connect your PC to the product when you are uninstalling the driver.
After checking of "Confirm disconnection", and click on the "Uninstall" button.
After HFTClean.exe is terminated, uncompressed files are automatically deleted.
Release notes
- 2022/05/27:Version 4.0
Added new product. - 2022/03/03:Version 3.9
Support for Windows11. - 2021/02/01:Version 3.8
Added new product. - 2021/02/01:Version 3.7
Added new product. - 2020/01/22: Version 3.6
Added new product. - 2019/04/03: Version 3.5
Added new product. - 2018/05/07: Version 3.4
Added new product. - 2017/09/28: Version 3.3
Added new product. - 2017/07/12: Version 3.2
Added new product. - 2016/09/13: Version 3.1
Support for USB-402. - 2016/03/30: Version 3.0
In the case of non-Japanese OS was displayed English. - 2016/02/02: Version 2.9
Support for USB-304.
Support for Windows10. - 2015/07/27: Version 2.8
Support for USB-305. - 2014/12/22: Version 2.7
Support for USB-025 and USB-039.
[]
